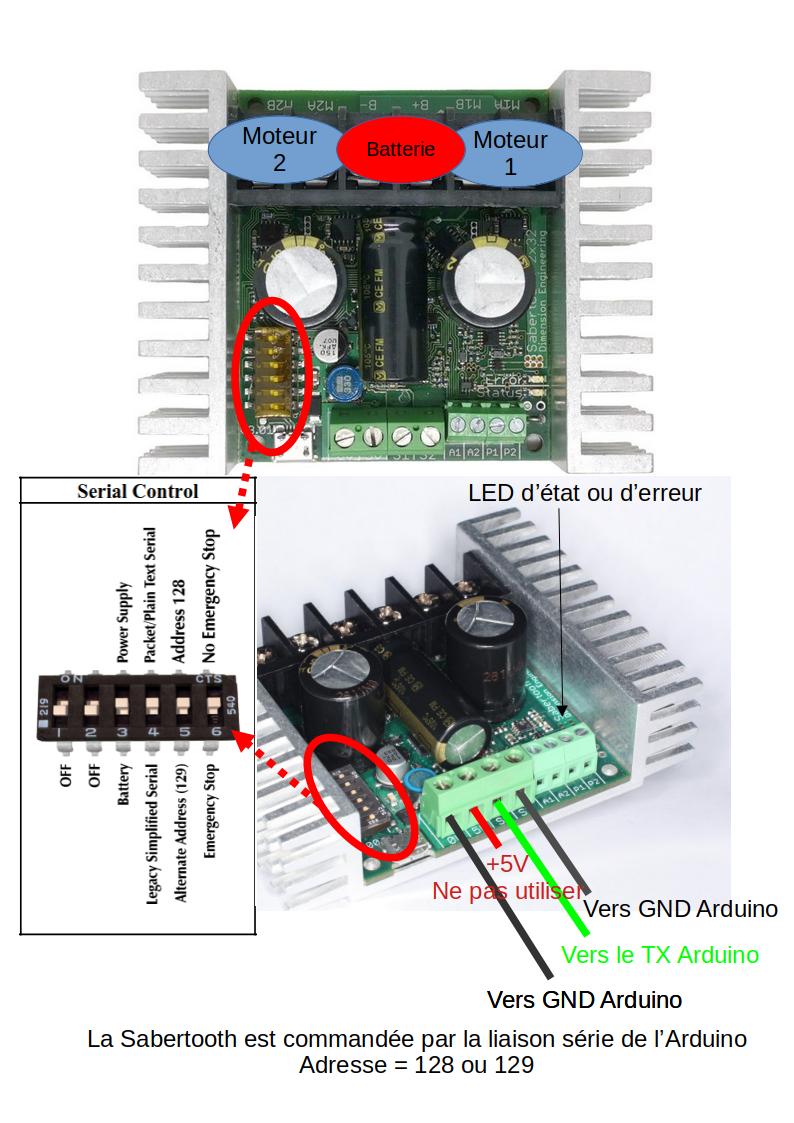
La carte Sabertooth est un driver de 2 moteurs (moteurs à courant continu):
- 2 x 12A -> La carte peut alimenter des moteurs jusqu'à 12A par moteur
- Tension d'alimentation: 6 à 30Vcc (NiCd, NiMH, Lithium, accu au plomb)
- Tension de sortie: de 0 à 33.6V
- à l'ISTY, nous pilotons cette carte Sabertooth au travers de la liaison série de la caret Arduino Mega.
- L'adresse est soit 128, soit 129.
- La fiche technique
- La librairie Arduino
Le schéma de câblage:
Les programmes
Phase 1 : Commande des 2 moteurs sous Arduino sans ROS:

Le programme Arduino sans ROS
#define nullptr NULL
// Sweep Sample for Packet Serial// Copyright (c) 2012 Dimension Engineering LLC// See license.txt for license details.
#include <Sabertooth.h>
Sabertooth ST(128,Serial3); // The Sabertooth is on address 128. We'll name its object ST.// If you've set up your Sabertooth on a different address, of course change// that here. For how to configure address, etc. see the DIP Switch Wizard for// Sabertooth - http://www.dimensionengineering.com/datasheets/SabertoothDIPWizard/start.htm// SyRen - http://www.dimensionengineering.com/datasheets/SyrenDIPWizard/start.htm// Be sure to select Packetized Serial Mode for use with this library.//// On that note, you can use this library for SyRen just as easily.// The diff-drive commands (drive, turn) do not work on a SyRen, of course, but it will respond correctly// if you command motor 1 to do something (ST.motor(1, ...)), just like a Sabertooth.//// In this sample, hardware serial TX connects to S1.// See the SoftwareSerial example in 3.Advanced for how to use other pins.
void setup(){SabertoothTXPinSerial.begin(9600); // 9600 is the default baud rate for Sabertooth packet serial.Serial3.begin(9600);ST.autobaud(); // Send the autobaud command to the Sabertooth controller(s).// NOTE: *Not all* Sabertooth controllers need this command.// It doesn't hurt anything, but V2 controllers use an// EEPROM setting (changeable with the function setBaudRate) to set// the baud rate instead of detecting with autobaud.//// If you have a 2x12, 2x25 V2, 2x60 or SyRen 50, you can remove// the autobaud line and save yourself two seconds of startup delay.}
void loop(){int power;// Ramp motor 1 from -127 to 127 (full reverse to full forward),// waiting 20 ms (1/50th of a second) per value.for (power = -127; power <= 127; power ++){ST.motor(1, power);ST.motor(2, power);delay(20);}// Now go back the way we came.for (power = 127; power >= -127; power --){ST.motor(2, power); // Tip for SyRen users: Typing ST.motor(power) does the same thing as ST.motor(1, power).ST.motor(1, power);delay(20); // Since SyRen doesn't have a motor 2, this alternative can save you typing.}}
Note: J'ai modifié la librairie Sabertooth.h comme suit:
#if defined(USBCON)#define SabertoothTXPinSerial Serial3 // Arduino Leonardo has TX->1 on Serial1, not Serial.#else#define SabertoothTXPinSerial Serial3#endif
Phase 2 : Commande des 2 moteurs sous Arduino avec ROS:
Voici le programme Arduino:
#define nullptr NULL
#include <ros.h>#include <std_msgs/Int16.h>
#include <Sabertooth.h>
Sabertooth ST(128, Serial3); // The Sabertooth is on address 128. We'll name its object ST. // If you've set up your Sabertooth on a different address, of course change // that here. For how to configure address, etc. see the DIP Switch Wizard for // Sabertooth - http://www.dimensionengineering.com/datasheets/SabertoothDIPWizard/start.htm // SyRen - http://www.dimensionengineering.com/datasheets/SyrenDIPWizard/start.htm//adresse Sabertooth est 128// Port TX3
ros::NodeHandle nh;
// Variables pour stocker les commandes des moteursint motor1_speed = 0;int motor2_speed = 0;
// Callback pour le moteur 1void motor1Callback(const std_msgs::Int16& cmd_msg) { motor1_speed = constrain(cmd_msg.data, -127, 127); // Limiter entre -127 et 127 sendMotorCommand(1, motor1_speed);}
// Callback pour le moteur 2void motor2Callback(const std_msgs::Int16& cmd_msg) { motor2_speed = constrain(cmd_msg.data, -127, 127); // Limiter entre -127 et 127 sendMotorCommand(2, motor2_speed);}
// Fonction pour envoyer une commande à la Sabertoothvoid sendMotorCommand(int motor, int speed) {
ST.motor(motor, speed); delay(10);}
ros::Subscriber<std_msgs::Int16> motor1_sub("motor1_speed", motor1Callback);ros::Subscriber<std_msgs::Int16> motor2_sub("motor2_speed", motor2Callback);
void setup(){ SabertoothTXPinSerial.begin(9600); // 9600 is the default baud rate for Sabertooth packet serial. ST.autobaud(); // Send the autobaud command to the Sabertooth controller(s). // NOTE: *Not all* Sabertooth controllers need this command. // It doesn't hurt anything, but V2 controllers use an // EEPROM setting (changeable with the function setBaudRate) to set // the baud rate instead of detecting with autobaud. // // If you have a 2x12, 2x25 V2, 2x60 or SyRen 50, you can remove // the autobaud line and save yourself two seconds of startup delay. // Initialiser le nœud ROS nh.initNode(); nh.subscribe(motor1_sub); nh.subscribe(motor2_sub);}
void loop(){ nh.spinOnce(); // Processus des messages ROS delay(10);
}
Notes:
- Il y a 2 subscribers:
motor1_subetmotor2_subqui attendent un entier sur 16 bits (de -32,768 à +32,767). ros::Subscriber<std_msgs::Int16> motor1_sub("motor1_speed", motor1Callback);-
- Crée un subscriber ROS nommé
motor1_sub. - Écoute le topic
"motor1_speed". - Déclenche la fonction
motor1Callbackchaque fois qu’un message de typestd_msgs::Int16est reçu. - Permet de traiter les commandes pour le moteur 1, en relayant les données vers la Sabertooth.
- Crée un subscriber ROS nommé
-
motor1_speed = constrain(cmd_msg.data, -127, 127); // Limiter entre -127 et 127-
- La liaison série de la Sabertooth (en mode simplifié (simplified serial mode)) accepte 1 octet pour la vitesse:
- 8 bits (0 à 256) avec 0 pour arrêt et 256 pour la vitesse maximale dans un sens
- 8 bits (-127 à +127) avec 0 pour arrêt et -127 pour la vitesse maximale dans un sens et +127 pour la vitesse maximale dans l'autre sens
-
-
-
- Déclare une fonction appelée chaque fois qu’un message est reçu sur le topic correspondant.
- Elle reçoit comme paramètre une référence constante au message de type
std_msgs::Int16. - Le champ
cmd_msg.datacontient la donnée utile (valeur de vitesse pour le moteur 1). - La fonction peut alors utiliser cette donnée pour effectuer une action, comme commander un moteur.
-
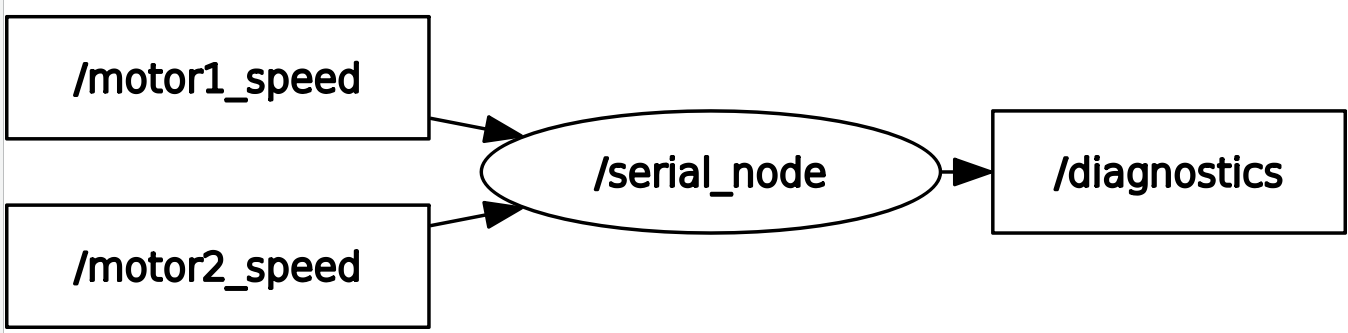
roscorerosrun rosserial_python serial_node.py /dev/ttyACM0rostopic list et vous devez voie apparaître les 2 topics:[INFO] [1731855306.441580]: Setup subscriber on motor1_speed [std_msgs/Int16][INFO] [1731855306.453146]: Setup subscriber on motor2_speed [std_msgs/Int16]rostopic pub /motor1_speed std_msgs/Int16 "data: 50"rostopic pub /motor2_speed std_msgs/Int16 "data: 50"Ouvrez un nouvel onglet dans votre terminal (Ctrl+Shift+T): rostopic list ou mieux,rqt_graph